Showing posts with label placemats. Show all posts

Thursday, December 15, 2022

Christmas Presents, etc.

I finished all of my sewing for Christmas, yipee!  First, I finished 10 placemats, using Pioneer Woman fabrics for my daughter-in-law.  I curved the corners and made bias binding for the first time.

front of placemats

back of placemats

I had 2 different patterns for fabric chalkboards.  I didn't really like either pattern, so I took the parts I liked and made some jumbo fabric chalkboards.  I made 5 chalkboards, but 3 of these are for my grandkids.  

fabric chalkboard with pockets for chalk and eraser

back of chalkboards, with one rolled up and tied

Since I got these things finished early, it gave me time to make some fabric books for my grandkids.  I don't use batting for these, instead I use fusible interfacing.  

4 fabric books

We've been watching Christmas movies several evenings.  I've been working on the Angels Among Us block.  I finished the July block and have started on the August block.

July block

Are you finished with your Christmas stitching?

Monday, June 13, 2022

Happy National Sewing Machine Day #1 (2022)

Today is the first National Sewing Machine Day of 2022!  (the 2nd day is September 10th).  To celebrate, I'm showing you a treadle that I cleaned and serviced for a friend.  This was his grandmother's treadle that had been in his mother's attic for years.  

dirty after sitting in an attic for years

pretty treadle peddle

nice treadle irons

wood cabinet in distressed shape

first photo I received of the treadle

The leather strap that attaches the machine lift to the table extension had snapped and wasn't fixable.  Hubby fixed this by using black paracord, which was much easier to use than trying to find another long, thin piece of leather.  Many machines use metal cord, but this one had used leather.  Hubby tested his idea of using paracord by using some of his yellow paracord first (shown in photos).

yellow is where the leather strap would have been

it took 2 of us to get the paracord 'fitted'

nice knot underneath to hold the paracord in place

Don't worry, we trimmed the ends of the black paracord that we used in the end so that the knot doesn't show (sorry, no photos of that).  

The protective glaze was coming off of the machine (the part that covers and protects the decals) so I had to be very careful when I cleaned the machine.  I think it cleaned up nicely.

nice and clean

showing the bed decals and the leaf tension

Another thing that had to be fixed was the pitman.  It had a broken pitman that was tied on with wire.  Hubby made a new pitman for the treadle.

broken pitman wired in place

broken pitman wired in place

I got to learn new things, too.  I have a machine with leaf tension, but I haven't sewn with it.  I learned about the tension on this type by testing out Doug's grandmother's treadle. 

Here is the treadle in it's new home, all cleaned up and ready to sew.  This is a New Home R treadle made in Orange, Mass around 1910-1911.

ready to sew

Remember those placemats I was working on? Well, the first 8 placemats are finished and in their new home.  I finished stitching the binding down yesterday.

fronts

backs

Guadalupe had asked for spring themed placemats and she loves these!  Almost all of the fabrics are from the Pioneer Woman fabric line (with a few from my stash).  I'll finish the other 14 placemats this fall, since I don't need them until Christmas.

Happy National Sewing Machine Day!


Wednesday, May 25, 2022

Sewing and a New Design Wall

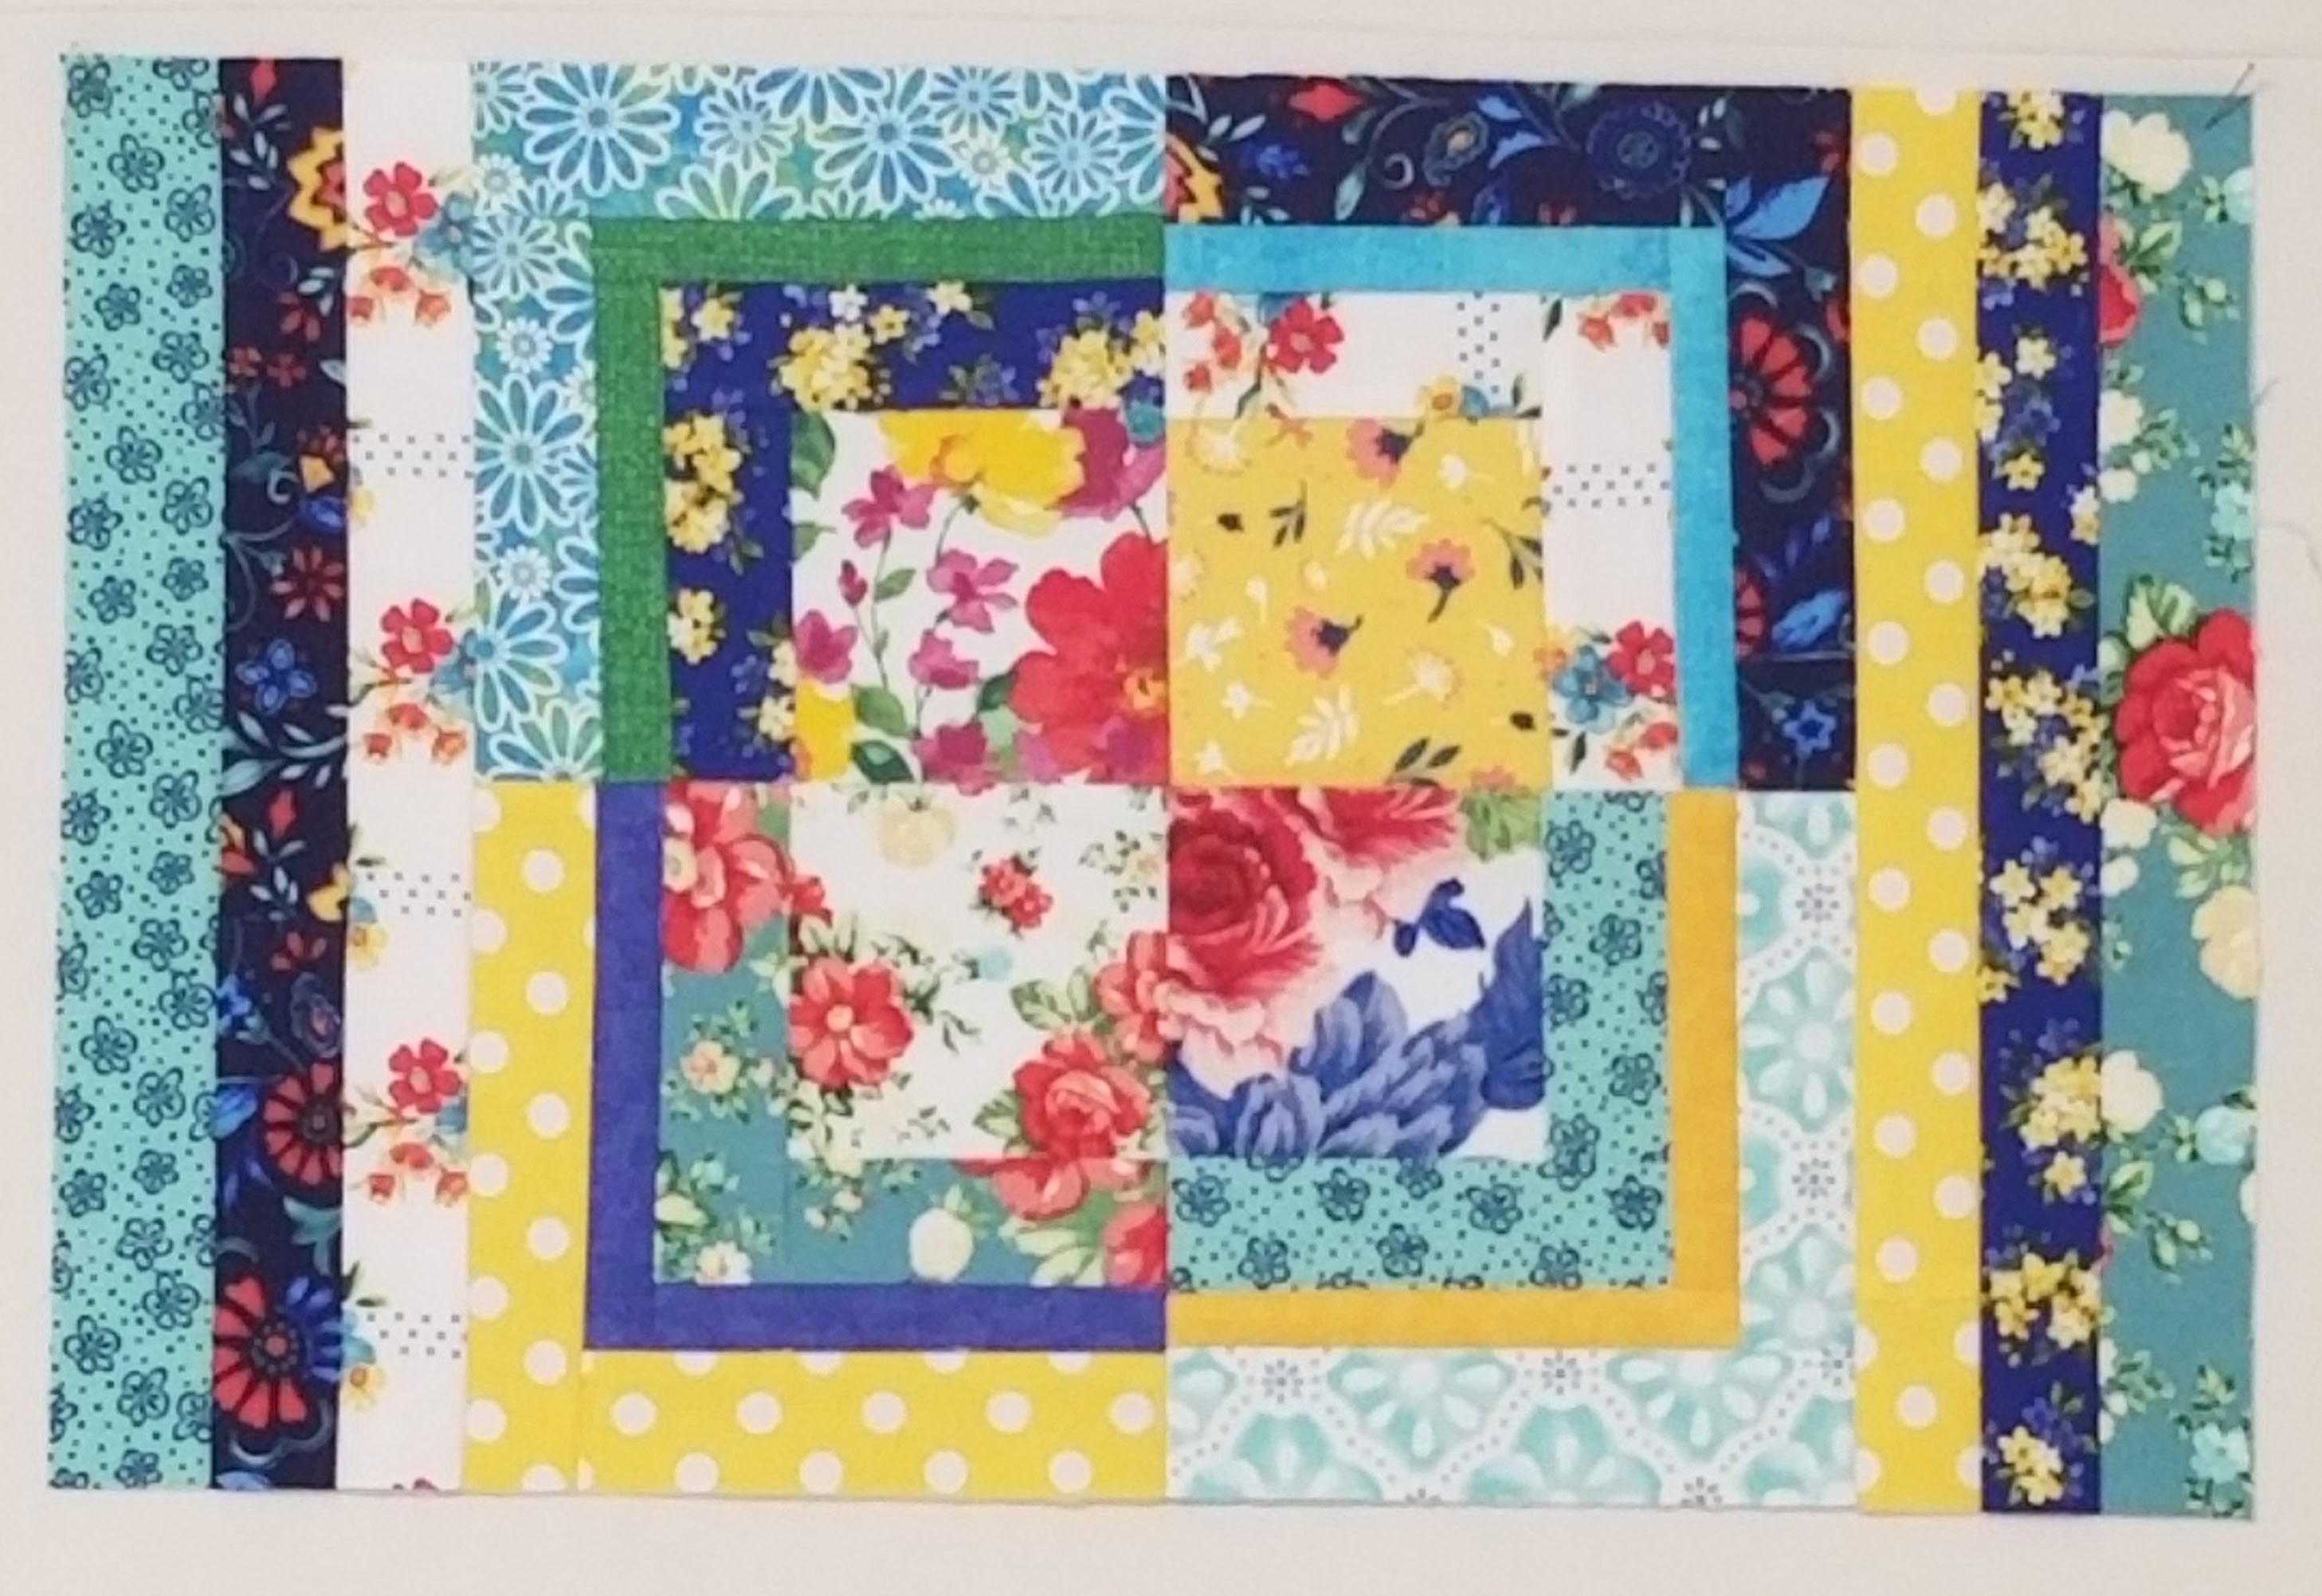
I was asked to make some placemats for a friend.  She wanted something that looked like Spring/Flowers.  I'd seen something online years ago (can't remember where), and decided to do something similar.

I made 4 different blocks, using fabrics from the Pioneer Woman collection.


Then I cut each block into quarters, and stitched a quarter of each block into a center square block.


I then used some of the extra strips I'd cut to make side pieces.

placemats

I finished 8 of these placemat tops.  I have the center squares stitched to make another set of 8 placemats and a set of 6 placemats.  I need to cut more strips for the 2nd & 3rd sets.  Meanwhile, I spray basted the first set just before supper.  Hopefully I'll get them quilted in the next few days.  

At my little quilt guild's sew-in last Thursday, Sharon showed us a portable design wall that she had made.  She'd gotten the idea online.  Well, I copied her idea, and made me 2 of the portable design walls.

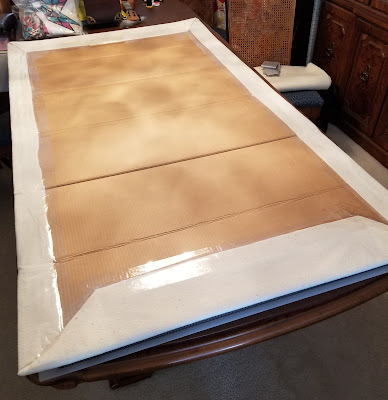
To make the portable design walls, you need one of the folding cardboard sewing mats, 2 curtain rods (48"-84" adjustable) and 10 large binder clips.  You also need some batting and some packing tape.

I already had several different folding cardboard sewing mats that I've picked up at thrift stores and garage sales over the years (they are great for protecting my dining room table when I spray baste small quilts).  These come in two different sizes.  I pulled out two of the larger sizes (72" long instead of 60" long).

2 sizes of folding cardboard sewing mats

I cut batting to cover these, and folded the extra batting around the back and taped it.

batting taped to the back of the folding cardboard mat

Next, you take your adjustable curtain rod and lay it along the edge of the mat, on the back, and attach it with the binder clips.

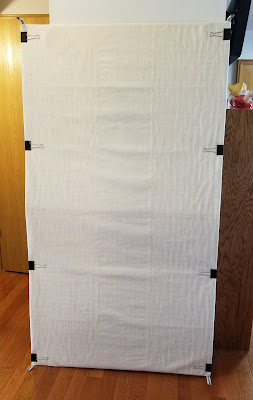
front of portable design wall

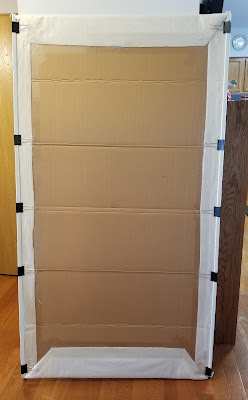
back, showing the curtain rods

I made two of these.

2nd wall is folded

Now I need to make some bags to store these in.  These will be great to take to sew-ins, etc.

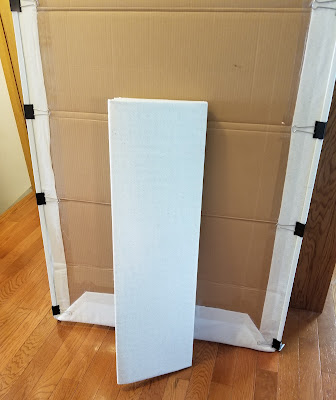
Another lady at my sew-in, had a different portable design wall.  She'd bought a folding display board, then covered the front of it with batting, and taped the batting to it.  Her portable design board sits on her table by her sewing machine.  Both are great ideas for portable design walls.


Tuesday, July 17, 2018

Binding by machine

I have several finishes to show off.  I've spent the past few days binding by machine, so that these could be finished.

Back in June, I started a set of placemats. 
placemat centers

These are now finished placemats.  I bound them with the faux piping binding method.   Thanks Deonn for the great tutorial.
bicycle placemats
There are 8 of these placemats, not just the 4 shown.  I used my walking foot to stitch the binding on (modern Janome machine).  It was just easier and faster with the modern machine.

Last August, I started making another 14 project bags.  I got them done EXCEPT for the handles and binding.  7 of those project bags have been waiting their turn to get their handles and binding stitched.  I finished these up today. 
7 project bags finished
Normally, I would stitch the binding down with my Featherweight, but, I needed to get these finished quickly, so, my Janome with the walking foot came to my rescue.  I can stitch much faster with the walking foot (my Featherweight doesn't like my vintage walking foot).  These project bags were made on 4 different machines (quilted on a treadle, pieced on a hand crank, handles and one side of binding stitched on the Featherweight, finished on the Janome).  Sometimes it takes a village of machines to get the job done ;)

I have two more projects to do, then I have to close down my sewing room.  My granddaughter, and her entourage are coming back on Sunday night.   Instead of 3 in her entourage, this time there will be 6 in her entourage, and they will be staying for a week.  (Yes, that is 10 people in my house for a week)!  Oh yea, I'll be heading to Michigan on Friday evening for the Michigan TOGA on Saturday.  Yep, busy here.  Lots of cleaning to be done before Friday, too.  I still need to finish gathering all my stuff for the TOGA. 


Thursday, July 20, 2017

12 Days of Christmas in July, part 2 & Giveaway #2

Welcome to my 2nd post for Sarah's 12 Days of Christmas in July blog hop.  Here are the blogger posts for today (besides Sarah's and mine).

Thursday, July 20th

 
Sarah is having a great giveaway of Tula Pink's new holiday line, BUT, you have to comment on all the blog posts in the giveaway to enter.  

Last blog post, I showed you 4 different projects.  I have another 4 projects for you today.  At the end, there is another giveaway.

#5.  Project Bags:
 
Project Bags are a great idea for crafters.  Knitters/crocheter can put their yarns and needles in a bag, to take with them.  They are great for sewing/quilting projects, too.  In May, I made 10 different project bags, and, last week, I started another 14 project bags.  I've already given some away, and several of the new project bags will be given away, too.  


  Those are just a few of the project bags I made in May.  
 
The pattern I used makes 4 different sizes, but, I've only made the largest size so far.  Here is the link to the pattern
 
These bags, in different sizes, would be great for kids, too.  Make a large one to hold Barbies, and a smaller one, to hold all of those Barbie accessories.  What about toy cars, or action figures?   These would be great for packing items, too (lingerie, etc).  
 
 
#6.  Pin Cushion Thread Catchers: 
 
These are very popular.  I've made several dozen over the years, and I only have one left, that isn't in use.  They are all over my house.  It's time to make another dozen, I guess.
a few I made last summer


pin cushion thread catcher, with matching sewing machine mat
 
These are great for stitchers, or for other crafters.  I've given them to scrapbookers, too.  They are a big hit at my family reunions.  I never go without a couple, and never come home with any.  I have a tutorial on this blog post.  Like I said, I usually make about a dozen at a time.  Really easy to chain piece.
 
Here are a few more that I've made.
pin cushion thread catchers


#7.  Table toppers/Table runners:

Who doesn't have a table or end table?  Table toppers and Table runners can be used in many places.  I have one in my sewing room, under my ruler holder.

I've made these for gifts, and even taught my beginning quilting class how to make them.  Many I've designed myself.  Just find a block you like, and create around that block.

They can be seasonal:
 
2 that I designed for my beginning quilting class

I went crazy and made over 40 Sixty degree table runners for gifts one year.  I only have one left (for me).
snowmen


Here are more ideas:


I have a tutorial for this one here.


#8. Placemats:

Who doesn't need placemats?  I use them everyday!  My little quilt guild makes 100 placemats for Meals on Wheels every Christmas (one side holiday, the other side neutral).

Last year, I made placemats for my Secret Sister.  Her kitchen is decorated in Roosters.
Guadalupe's placemats
 I'm working on some camper placemats for my brother, to put in his 5th wheel.  Sorry, these are not finished.

 
 You don't need a pattern to make placemats.  Design your own!  Standard placemats are 14" x 18".
 
OK, here is today's giveaway!
extra large Project Bag
PLEASE, read the rules below.  I've had so many people comment that are no-reply commenters.  I've added a message to each of those, below the comment they made on my previous post.  
 
*Here are the Rules!  First, if I can't reach you, you lose out, so, PLEASE, when you leave a comment, make sure your email address is included.  I can NOT reach Google+ commenters, and No-Reply commenters.  If I don't reply to your blog comment within 48 hours, then I can't reach you.  Try again, with your email attached.  I'll draw a winner on July 26th, after the blog hop is over, to give everyone a chance to comment.  You do NOT have to be a follower to win.  If you can't comment on my blog, look under my profile, at the top of the blog, and my email address is there.  Send me an email, and what blog post you are commenting on, and I'll enter you in the contest.  See, EASY!  Also, I reply to every comment that has an email attached, since I think comments are IMPORTANT.  
Good luck!