Tuesday, April 4, 2017

Quilt Guild Program

Last night was my little quilt guild, Wego Quiltin'.  I provided the program for the evening.

Several readers gave me some ideas for what to present.  ES (sorry a noreply blogger) sent me this link, as an idea, thinking that it could work with fabric, not just paper.  Since it was Easter themed, I decided to go with it.

Instead of using a frame, I went to Hobby Lobby and got some crafting cards, an X-acto knife (no idea where mine was) and some ideas.  I came home and pulled out some strips that have been sitting in a bin (from baby quilts last year) and got started.  (I've really been using some of my scraps this year)!

First, I used an Easter egg shape, from a banner, as my template.  I traced around it (inside the card) and proceeded to cut it out.  I then traced it onto fabric, and cut it out, leaving a large extra edge (between 1/4" & 1/2"), and started sewing strips on the fabric.  
strips stitched to foundation fabric
I then taped this to the inside of the cut out card.  I cut another card in half, and glued it to the back of the fabric egg, so that it would look nice inside the card.
finished Easter card
This was quick and easy.

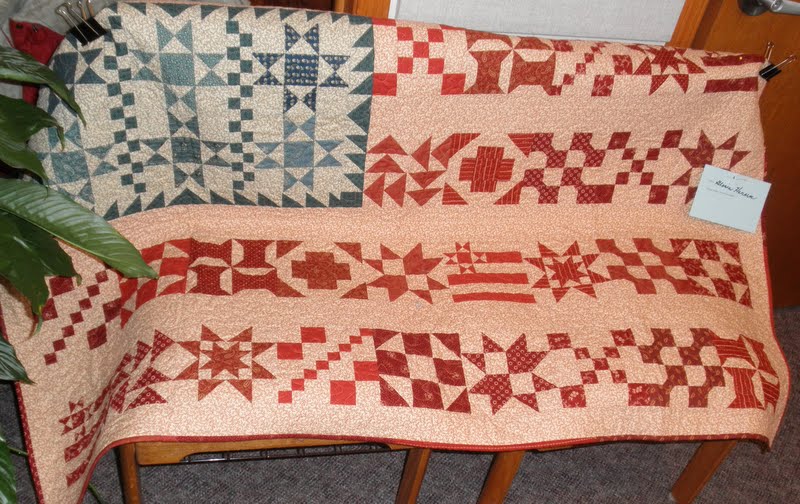
On Friday, after the quilt show, I went to a quilters sale, and, they had a bag with finished blocks for $2.  Woohoo!  All the blocks would fit nicely in the cards I'd already purchased.  Most of the blocks had foundation backing, so, they worked well.  It was harder to work with the blocks that didn't have a foundation backing.  They were much flimsier.  I proceeded to make several more cards with those blocks.


using 3 tiny blocks together


this would have done better on a card that wasn't white, so that you could see the white fabric better

I'd seen a cute box at Hobby Lobby, and decided that it would also work with these blocks.  I saved the last block for the box.
block in a box lid
 It was a bit harder to work inside the lid, but, it worked well.

This was a fun project, and the ladies liked it.  I'll do this again.


I have to make several sets of Half Square Triangles for an exchange I'm doing.  I decided to try a different way to make the HST's, using 'The Magic 8 Method' from Genius Hacks Every Quilter Should Know, on Craftsy (pgs 7-8).  I hadn't tried this method before.

I followed the directions, and made my HST's (oops, I forgot to take pictures).  The first set turned out nice, except, I think I'd add 1 inch to the equation, instead of the 7/8", so that I could trim my HST's down.  I used a scant 1/4" seam, and my HST's just barely came out.  The directions call for a full 1/4" seam.  I'll make the next sets with an even smaller seam size, just in case (I already cut out the material, oh well).  I did use my BlocLoc ruler to square the HST's up (I love my BlocLoc ruler).

I've saved all the ideas that everyone sent to me, and will be using them in future guild meetings.  Next month someone else is doing the program.  Thanks for all the ideas!  They will come in handy.


Saturday, April 1, 2017

Channahon Quilt Show

The Morris Quilt Guild had a quilt show at a church in Channahon, IL.  I went yesterday (it is also today).

I've been to this show in the past, at a different location.  I liked this show, but, I thought previous shows were better, since they hung the quilts before, and this time the quilts were draped across the pews in the sanctuary.  It's harder to see the quilts when they are draped, not hung.  Still, some lovely quilts.

right side of the sanctuary

left side of the sanctuary
I did get some up close pictures of some of the quilts that caught my eye.  This Celtic quilts had all the applique done by hand, and little crystals glittered on the circles.

fun and bright pinwheels

Pretty spring flowers
Little quilts were hanging on the walls, under the windows.  I've made this cat in a pumpkin block before.

Look at all the applique that went into this little quilt.

This next quilt reminds me that I really need to finish my quilt from this same BOM, back in 2005.  I only have 1 block left to make, then I can make my sashing, and finish the quilt.

I just need to make the bottom, right block so that I can finish my quilt
Yes, that quilt is on my 2017 'To Do' list. 


this is a different Celtic quilt.  It is turned differently, and finished differently

I love churn dash blocks

fun and bright

tiny postage stamp pieces

I love how turning the block, and using different colors for the edges gives this quilt a secondary pattern

lots of small blocks makes for a great flag quilt
Several years ago, I blogged about this same quilt show.  The first thing I noticed, as I drove into the parking lot, back then, was a quilted Tahoe.  The challenge quilts for this quilt show were 'Parade' mini quilts.  They had 2 different elephant parade quilts (sorry, no pictures, drats), and several others.  I took pictures of these two challenge quilts that showed the quilted Tahoe, from the past.
quilted Tahoe


another quilted Tahoe
If you click on the link above, you will see several pictures of the original quilted Tahoe.


Instead of raffle baskets at this quilt show, the members got in groups, and decorated chairs for the raffle.
pretty in pink

School Days

2 different raffle chairs

I wish I had a place for these

nice quilt with the antique needlepoint chair

I know some of the ladies who worked on this one

I need to figure out how to do this to one of my chairs

cute for a porch, love the quilt barn block

I bought a ticket for this one, mainly for the foot stool

tuffet and chair set

There was a members booth, but, I only bought some quilt themed reading books this time.  There was also a vendors area, where I purchased a few items (sorry, I didn't get pictures).

I went to an Estate Sale, not far from this quilt show, and saw the prettiest pink Necchi sewing machine for sale (no, I didn't get it).  I did get a set of embroidered quilt blocks.  I'll have to think about how to put them all together.

After that , I headed to a Quilter's Sale, closer to home.  Uh oh!  I DID buy quite a lot there, including some Christmas presents.  They had quilt tops and table runners, ready to layer and quilt (yes, I got some), fabrics (no, I didn't get any of those) rulers, patterns and books, and notions.  I haven't taken any pictures of what I got there, either.  I got a large IKEA bag full of goodies.

Lots of great ideas from some of you, for future quilt guild meetings.  I'm working on one, and will get some of the other ideas ready for future months.  Thanks!

****Some of you are no-reply, and I can't respond to your comments :(  I really do want to respond to EVERY comment personally.  PLEASE leave me an email address, if you are no-reply.  If you don't get a response to your comment within 48 hours, you are most likely a no-reply commenter.  If you don't want your email address posted in your comment, then my email address is listed under my profile, on the right sidebar, at the top of the blog.****
  

Thursday, March 30, 2017

Cleaning!

I haven't cleaned any machines since last fall, before I hurt my elbow.  It's hard to turn the hand wheel and screwdrivers when your elbow hurts.  Since my elbow is doing better, I decided that it's time to clean some machines.

First, a friend asked me to see if I could get his machine to stitch.  He'd loaned it out, and, when he got it back, it wouldn't pick up stitches.  First, I cleaned the machine, then I got it stitching.  I didn't get any 'clean' pictures, but, here is the machine.
Gene's Kenmore

Last fall, Deborah asked me if I wanted a vintage sewing machine that she had.  She had bought it to restore it, but, never got around to restoring it.   Hubby and I picked it up after Thanksgiving, but, because of my elbow, I hadn't had a chance to clean it up and see if it stitched.  It doesn't have a power cord, but, it has the foot control.  I think I can wire in the power control, but, I didn't have the wiring.  I might rewire this later. 
Japanese Post WWII series 15

back, before cleaning

missing the bobbin case
grime, and bobbin tire is brittle

grime under the motor area


First, I took as many parts off this machine as I could, and cleaned them.
nice and shiny now

 This is what was left, needing to be cleaned.
poor, naked machine
This machine had a hard life.  There are holes in the metal to the bobbin area.
2 needle holes in the thin metal, by my thumbnail
This machine cleaned up nicely.  There is some discoloration from old oil, that won't come off, but, it's fine for a machine that is about 70 years old.
all cleaned up

clean machine

I got some sewing machine attachments, including a 15 series bobbin case, off the freebie table at my large quilt guild, a few weeks ago,   I used the bobbin case for this machine, along with one of the bobbins.  

For the moment, at least, this is a hand crank.  I think I'll go find some paint to match the old hand wheel, and paint the new, spoked hand wheel and hand crank to match (or get hubby to do the painting).
old hand wheel against black spoked hand wheel and hand crank

I don't think I could match that lovely turquoise, but, I might be able to.  I'd have to take the whole machine in with me, since there isn't any removable parts on it that are turquoise. 

While all the cleaning stuff was out, I decided to clean another machine. 

Last weekend, at the quilt show, I got a little Singer 99K.  It came in a cabinet that is in pretty bad shape.  The only way to save that cabinet is to sand it down and paint it.  Most of the veneer is chipped off of it.  I hate to get rid of a 3/4 size sewing machine cabinet, since they don't come around very often.  I might work on it when the weather gets warmer.

This machine was FILTHY!
bobbin case area

back of machine with motor removed

dirty bobbin winder
This machine took a lot longer to clean, because of all the grime on it.
just a few of the cotton balls I used to clean this machine
There was lots of dried on oil all over this machine, and, old oil attracts dirt and lint.  I had a hard time getting the feed dogs out of this machine because it was 'glued' to the machine. 

The motor works on this machine, but, it runs slowly.  I won't use the light, since the wiring to the light is bad.  Not sure I can rewire it, since I can't find where to get to the wires on the light itself.  I may disconnect it later, just in case.

This machine cleaned up nicely, even if it did take more time than the other machines.
cleaned machine, great decals

back of cleaned machine
I can't get this to stitch properly.  I think it needs more cleaning (presser foot doesn't like to go all the way down). There is probably more dried on oil on the presser foot bar.  Also, the stitches are really bad underneath.
underneath stitches
Not sure if I was so tired that I threaded it incorrectly, or, I just couldn't get the tension adjusted..  For the moment, this machine is waiting for more work.  I had to put it away, since it was dinner time. 

The only stitching I got done today was testing stitches on all three machines.  At least two of the machines stitch nicely after they were cleaned. 

Have you cleaned and oiled your machine lately?????