Monday, January 29, 2018

Chocolate 9 Patch Block Exchange

Treadle On, my people powered sewing machine group, is having a fun block exchange. I am the hostess of this exchange.  This blog post includes all the info about the exchange.

Who likes Chocolate???  Who likes chocolate mixed with other, yummy flavors???  Who likes fabric???  Who has a people powered sewing machine (treadle or hand crank)???  I can answer 'YES' to all of those questions. 

This block exchange makes 9 1/2" unfinished 9 patch blocks (3.5" squares, with the 'chocolate' color on the 4 outside corners and the middle block).

Use colors of chocolate (milk to dark chocolate) and add in other colors that are in different chocolate candies (mint, raspberry, peanut butter, caramel, strawberry, almonds, etc).  (Any other 'flavors' you come up with???)

Number of Blocks in a set: 8
Max. number of sets: 4

Here are the 'flavors' that I chose to use.

Since these blocks are 9 1/2 inches, your squares need to be 3 1/2 inches.  I chose to cut strips and string piece my blocks.  It's more accurate and much quicker. 

From you 'chocolate' fabric, cut 5 strips, 3.5" wide, by width of fabric.

From your 'candy' fabric, cut 5 strips, 3.5" wide, by width of fabric.  Set one of these strips aside for now.

Stitch 2 sets of 'chocolate', 'candy', 'chocolate' fabrics together.
Stitch 1 set of 'candy', 'chocolate', 'candy' fabrics together.

Carefully cut each of these sets into 9.5" x 3.5" sections.  The photo below shows mine cut, and sitting next to each other, in sewing order.

Stitch these units together to make your 9 patch block.  Here is my finished 9 patch block.
finished block
Using this method, you end up with 11 blocks.  8 blocks for the exchange, and 3 bonus blocks for you.

Now, take your extra 'candy' strip of fabric, and cut it into 3.5" squares.  These are your 'signature' squares.  Sign them (with a Pigma or Micron pen) with all the proper info (your name, location, what machine used, 2018 Chocolate TOBE).
one of my signed squares
Attach your signature square to the back of your block. 
signature square attached to back of block
I just basted my signature square to the back of my block, with a 'loop' of thread.
square basted to block
The signature squares can be added to the back of your quilt, so that you will know, by matching the fabrics, who made each block in your quilt. 

Mail by dates: International, May 6, 2018, USA, May 12, 2018

Now that you have all the info, who wants to join this block exchange?  Go to Treadle On, and join the group, and get the rest of the info for block exchanges. 

I have one set made, and 3 more sets cut out.  

Saturday, January 27, 2018

Elephant Parade is Finished!

My large quilt guild, Pride of the Prairie, issued a challenge for the upcoming quilt show.  It is a paint chip challenge.  I posted all the info about the challenge on this post. The challenge was issued at the January 2017 meeting.  I got started right away.  This is only the 2nd time I've done one of the challenges for the quilt show.  Most of the entries are 'art' quilts, and that is way out of my realm of comfort.  I'm pretty traditional, not artsy. 

I figured that just using 3 colors from paint chips was something that I might be able to do.  Off to Home Depot I went, and collected tons of paint chips with colors that started with either a C, H, or E (the first three letters of my first name). 

I narrowed the chips down to just 3, and got started.  Once I'd seen the name 'Elephant Gray', I knew what I wanted to do (no, I didn't use that paint chip, since I couldn't find a gray fabric that matched the paint chip).  More info on my next moves are on this post and this post (mainly about the tail). 

After those posts, I put the elephant aside, since I had several things that had 'due dates' long before the elephant challenge quilt.  Then, I found out that I would be a first time Grandma, and, of course the elephant was put aside for the Peter Pan quilt. The Peter Pan quilt took me from August thru December to complete.  Poor elephant, no time to work on it.

Last week, I finally pulled the elephant quilt back out, and got started on finishing it.  In the last 24 hours, I've attached the tail and stitched button leaves to the tree. 
leaf buttons on the tree

A friend thought I should add embroidery to the little elephants for mouths and eyes.  After playing around with a drawing, to see how the mouth should go, and where the eye should go, I decided to add ears to the little elephants instead.
ears on the little elephants
 The ears look much better in person, than in my bad photos. 

Here is the finished elephant quilt.
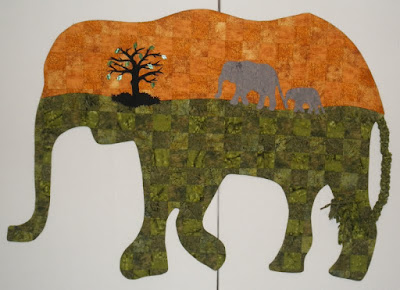
Elephant Parade, finished

I have decided that this quilt is DONE!  I really like this elephant quilt.  I've done sew many things that I'd not tried before. 

The challenge says that the quilt can't be smaller than 24" or larger than 45".  My elephant measures 31.25" long and 43.75" wide. 

We also have to use at least one handwork method on the quilt (binding doesn't count), and I hand appliqued both little elephants, hand stitched on their ears, hand stitched the buttons on the tree, and braided the tail and attached that, too. 

If you are in the Chicago area, I invite you to come see my quilt(s) and vintage machines at the show.

March 10 & 11, 2018
Richland Grade School
1919 Caton Farm Road
Crest Hill, IL 60403


Friday, January 26, 2018

Sewing Chairs

Back in April, I saw some great chairs at the Channahon Quilt Show (bottom 10 pictures on the post).  I figured that I could recover a couple chairs myself.  I'd just recovered a sewing machine chair a few weeks before. This summer, I bought 4 folding chairs just for this project.  I've recovered 2 of these chairs.  The other 2 chairs will just have to wait their turn to get recovered.  I've written a tutorial on how to recover these chairs.

First, you need to get chairs that the chair pads screw onto the chairs. 
4 screws hold the top chair pad to the frame
4 screws hold the bottom chair pad to the frame

I got these chairs at the local Meijer grocery store when they were on sale.  They were about $15 per chair. 

The fabric is all from my stash.  I have a nice stash of 'sewing themed' fabrics that I'm finally starting to use.  I used fusible fleece as my backing for these.  I didn't want to add a 3rd layer, since the screws are short, and too many layers would make it hard to screw the chair pads back on the chairs. 

First, I took the chair pads off.  I labeled the direction on the bottom of the chair pad so that I could get it back on correctly.  I then cut some fusible larger than the chair pad.
fusible fleece as backing for chair pad

I then fused the fleece onto the back of the fabric I wanted to use.  Make sure it lines up nicely.  I then quilted thru the layers.  I don't free motion quilt, but, this would have been a great 'practice' for free motion quilting (or ruler quilting).  I was in a hurry, so, I just did straight line quilting on one chair fabric, and cross hatch quilting on the other chair fabric.  You can't see the quilting from the front in the pictures, so, I took a picture from the back of one.  I didn't really want my stitching to show, so, I used white thread in the white areas and black thread in the black areas.
straight line quilting from the back

I used part of a panel for one chair, and cross hatch quilted it.  I had a tiny bit of coordinating fabric to use for the top of the chair.
panel section, quilted

coordinating fabric for the top of the chair

Ok, that was the easy part.  Now for the harder part, attaching the fabric to the chair pads.  You will need a stapler and a hammer.  I had to go buy the correct size staples.  I used 1/4" staples.  Anything longer might poke thru when the chair is sat on.  Ouch!  The hammer was used to finish driving the staples in.  No matter how hard I pressed down, the staples didn't go all the way in, so, I hammered them the rest of the way in.  Do this on a firm surface (I was bad, and used my cutting table). 

Start by lining up the chair pad against the back of the quilted fabric.
chair pad lined up against back of quilted fabric

On one chair, I used fabric with stripes, so, it helped to get the fabric lined up nicely.  First, fold the fabric back over the bottom of the chair pad, and staple one side, in the middle.  Then do the top, then both sides.  Turn the chair pad over to make sure everything is lined up nicely before you start putting in more staples.  *Tip:  Leave the screws in the screw holes so that you can find them easily, and so that you don't accidentally staple into the screw holes.  Yes, you will be covering up the screw holes when you staple the fabric down. 

When you are sure everything is lined up nicely, then finish stapling all 4 sides, leaving the corners till the end.  You will need to 'pleat' the corners in a few places, to get them to look nice.  Here are the backs of the chair pads.
pleated corners are stapled down

some of my pleating on the corner
The bottom chair pads are the easy part.  That is why you want to do them first.  You can learn on the bottom, easy part. 

Now, to do the harder part, the top chair pad.  With the curves, you need to go slower, and be more careful.  It isn't hard, it just takes more care.

First, line up the quilted fabric against the front of the chair pad (back).
lined up, ready to start stapling 

Put one staple along the top edge, in the center.  Then put one staple along the bottom edge, in the center.  Turn over to make sure the fabric lines up like you want it to. 

Next, put a staple along the bottom, one on each side of the staple in the middle.  Now do the same with the top edge. 

Now you need to put one staple along the curves on the side, slightly stretching the fabric as you go.  Do the same with the other side.  Turn over and check, to make sure it looks good. 

*Tip:  I put 2 staples in each place, one slightly lower than the other, on all the chair pads, to secure the fabric well.  

As you go along the curves, you will need to 'pleat' the fabric, and staple each pleat.
pleated the edges along the curves

up close of the pleats along the edges

I stapled close to the edge of all the chair pads.  This was only a problem in one area, the bottom of the back chair pad.  You can see some of the staples from the back of the chair. 
one staple peeking out after the chair back is attached 
Personally, this doesn't bother me, since no one is going to be looking at this part of the chair.  They will only be looking at the chairs from the front of the chair. 

One more thing before you attach the pads to the chairs.  Remember those screws you left in the chair pads?  Well, now is when you need to cut away the fabric around those screws.  You can 'feel' for the screws, then carefully cut around the screws to expose them.  Using sharp, pointed scissors makes this much easier.  Keep trimming until the entire screw is showing. 
showing fabric cut around the screw

Remove the screws, and line up the holes with the holes in the chair.  Make sure your chair pad is going the correct direction.  Put the screws back, thru the chair screw holes.  *You will need to press hard to the chair pad, to get the screw to engage.  Do NOT tighten the screws until all the screws are attached (in case you need to adjust the chair pad).  When all the screws are attached, tighten all the screws.  Do this with both chair pads (bottom and back).  Woohoo!  You are DONE! 

This is the chair I finished last night.


up close of the chair pads

And here is the chair that I finished this morning.


up close of chair pads

*  You can also paint the chair to match the fabrics, if you'd like.  I had thought of this, but, since it is winter (way too cold to be outside), and I was in a rush, I didn't do this.  These fabrics look nice with this color paint.  Depending on the fabrics I pick for the other 2 chairs, I might spray paint them before recovering them.  Just take the chair pads off, get some spray paint you like, and spray the chairs.  It would probably take 2-3 coats to cover everything. 

These chairs will be in my vintage sewing machine booth, at my quilt guild's quilt show in March.

March 10 & 11, 2018
Richland Grade School
1919 Caton Farm Road
Crest Hill, IL 60403


Come visit me (and the chairs) at the quilt show!  I'll have some 'wheelies' on these chairs, too. 

Thursday, January 18, 2018

Stitching, stitching, stitching.....

I've been busy, really! 

My large quilt guild is having a quilt show March 10-11, 2018.  If you are near the Western suburbs of Chicago that weekend, I'd love to see you at the quilt show.  I'll have a booth (again) showing off some of my vintage sewing machines.  This will be the 4th time I've had a booth at this quilt show. 

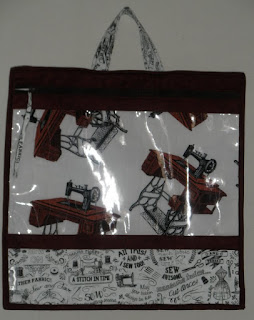
Tonight is when we have to turn in all the paperwork for the quilt show.  Boy does that take a long time to get ready.  I'm entering 3 quilts and 2 bags.  I also promised to make 2 Project Bags for the Silent Auction.  I finished them up earlier today.  Yes, they are all sewing themed fabrics. 

As usual, I made 2 of each fabric.  One of each will go to the guild, and I'll keep the other one for me.  I changed up how I did the zipper pulls this time.  I used cording, and added a shank button to each. 
zipper pulls for Project Bags

I finally pulled out my elephant quilt.  I hadn't worked on this since last Spring.  It is my entry in the Challenge for the quilt show.  Time to get this one finished.  I had to take a picture of it for the paperwork.  It doesn't have to be finished until the night before the quilt show. 

There isn't much left to do on the elephant quilt, thank goodness.  I needed to make a backing for it.  I had already planned to use the extra strips of fabric from making the front of the quilt.  The backing is enveloped.  I knew I'd have a hard time trying to add binding to this, so envelope method was my only option.
right sides together, ready to stitch on the backing
The tape measure is to make sure that the quilt measures correctly for the challenge rules.  The finished quilt cannot measure more than 45" in any direction, or less than 25".   Mine measures 31" tall, and 43" wide (without the tail). 

Due to the size of this and the tiny harp space on my Featherweight, I had to stitch the backing on with my Janome.  It was hard, since I had to follow each leg, inside and out. 
lots of quilt jammed in the harp area
I didn't want to trim anything until AFTER it was stitched down, which was a good thing, since I forgot to pin one side of 2 different legs.  I also realized (too late) that I forgot to thread paint the tree down.  Oh well.  I don't know how to thread paint anyways, so, it probably wouldn't have turned out very well.  Here is what the elephant looks like at the moment.

still unfinished

with paint chips on the matching fabrics

We have to match our paint chips.  The gray looks a little darker, since the Texture Magic was shrunk.  It added 'shadows'.  I can't help that.  I think the other 2 colors are a good match.

I still need to stitch on the tail, and add some buttons to the tree.  I also need to add something to the faces of the elephants, before I stitch the backing closed.  That all will get done in the next 2 weeks. 

I've also been working on 2 different baby play mats.  They are slow going.  Hopefully both of them will be finished in the next week or so, too.  The hard parts are all done now.  I've stitched on these at 2 different sew-in's this past week.  Here are pictures of what the bottom of each play mat will look like.
Pirate (Peter Pan) play mat

car play mat
 I just have to baste and quilt the bottom pieces, and add the last of the connecting hardware.  That is the easy part (I hope).  The pole covers were slow going (hard to turn inside out, since they are so narrow).

Oh yes, I am almost finished stitching the binding down on the Neverland quilt.  Hopefully it will be done later today.

I hope that you are also having a good stitching week.  

Wednesday, January 10, 2018

It's Quilted (and a question for you)

The Riley Blake 'Neverland' baby quilt is quilted.
That is blue Minkee, from my stash, on the back. 

Now, I have a question for you.  I have 2 choices for binding. 
#1.  Big piece of material with a kinda stripe to it.
#2.  Same greenish fabric that surrounds the flying geese.
binding choices on quilt
Let me know which one you like best, please.  I want to stitch the binding on at Saturday's sew-in.

On Monday afternoon, after I finished this quilt top, I decided to trim some burp rags that I'd purchased.  The first one, I tried adding the trim (extra strips of the Neverland jelly roll) to both sides of the burp rag.  This didn't work very well.  I thought it was all lined up nicely, but, it wasn't.  Oh well, the baby won't notice.
double sided burp rag
After that, I decided to just add trim to one side of the burp rags.  I like this better.  Yes, the bottom one is pieced with 2 different colors.  No waste here.
5 more burp rags
If I get around to it, I might try embroidering Gwendolyn's name on some of these, with my Janome.  The Janome has lots of fun stitches, and a small font for Embroidery (nothing fancy). 

My Christmas trip to Texas was super busy.  I didn't get to any thrift or antique stores, like I normally do.  I DID get to see a special blogging friend.  Sue, from Collecting Texas Gal, has a fiber arts shop at the Chicken Farm Arts Center in my hometown. The Chicken Farm Arts Center was having a special night for Christmas celebrating while I was there.  I only got to go for a few minutes, but, that was enough to finally get to see Sue's shop.  I got 'Betty Sue' the purple featherweight, from Sue.
Sue's shop


me & Sue
 This visit was the only shopping I got to do (besides IKEA with my son and daughter in law) on the trip. 

Let me know what binding choice you prefer.  Thanks!


Tuesday, January 9, 2018

Back Stitching

I'm finally back in my sewing room, stitching away. 

I have a jelly roll, that I wanted to turn into a quilt.  I'd seen some ideas on Pinterest, but, I only liked parts of the quilts.  So.... graph paper to the rescue, once again.
pattern drawn
Well, I really wanted to use Betty Sue, my purple featherweight, to sew all these strips.  Problem was, Betty Sue has been making thread nests since late last summer.  With all the work on the Peter Pan quilt, I hadn't had time to really work on Betty Sue, to figure out what was wrong.  I finally found part of the problem after taking the bottom plate off and working the hand wheel over and over.  A tiny end of thread finally showed up from behind the bobbin case.  After carefully unwinding it, it was over a foot long.  After a few more adjustments, Betty Sue was back to stitching .
Betty Sue, stitching nicely now
First, I stitched 27 strips together.
sorry, bad picture
Then I cut and stitched the flying geese.  I made bonus HST's with the corners. 
flying geese and bonus HST's
I finished the quilt top yesterday afternoon. I wanted to show the quilt top off at my little quilt guild last night.  (sorry, I didn't get a picture)

This is where I am now.
spray basting backing and batting
I'm letting this layer dry before I spray baste the top.  I'll quilt this one myself, using Lorna's wavy line quilting.  My Janome is great for this part.  Hopefully I'll have a completed quilt to show you soon. 

I forgot to take pictures of the other sewing I did yesterday afternoon.  I'll save it for another post.  Lets just say that I'm not wasting the extra strips from the jelly roll. 

Hope you are getting lots of stitching done, too. 


Saturday, January 6, 2018

Book Review

Holding the Fort, by Regina Jennings.

Image result for holding the fort book


This was a fun book to read.  Set in 1885, a saloon singer heads out West, to find her brother.  Due to some comedy of errors, she winds up as the governess to the commander of the Fort, where her brother is stationed. Trying to hide her past, leads to even more comedy of errors, until, finally, the truth comes out. 

This book gives a great look at frontier life at a Fort, back in the wild west, including Indians, settlers and cowboys.  I grew up only a few miles from Ft. Concho, which reminds me of this forts setting.

The story is set at a real fort, Ft. Reno, in Oklahoma.  The Indians, and several other character's are real.  Regina Jennings did a great job of weaving fictional and real characters and events together. 

This was a fun book to read.  It even has a treadle sewing machine mentioned.  This is the first book in a new series.  I'm looking forward to the next book. 

I highly recommend this book. 

*I was given this book, in exchange for an honest review.  

Monday, January 1, 2018

2017 in Review

I did finish several projects in 2017.  Even more projects were started, that won't be finished till 2018 or later.  I'm just going to show some of the 'finished' things from 2017.

Quilts:

I was part of a blog hop to introduce a new quilt book, back in January.  Since I was gone most of January, I only got the top made, and still haven't quilted it.
Sprightly (still just a top)
 This was such a fun and quick top to make, that I made a smaller one for a baby quilt.
Baby size Sprightly quilt
I only finished 2 quilt tops for Quilts of Valor this year (bad me, but, I do have 2 more started).
Crosses & Losses
Disappearing 9 patch
Way back in August, I started paper pieced blocks for a baby quilt.  I made 2 of each of those paper pieced blocks, and wound up making 2 identical quilts.  There are 776 pieces of fabric in the 6 paper pieced blocks (per quilt).  Needless to say, I didn't get much else stitched while I was working on these quilts.  I finished the last of the binding on the 2nd quilt over the Christmas holiday.  Both of these quilts will go to my soon to be born granddaughter, Gwendolyn Avery (due in Feb 2018).  My son and daughter in law have the first one, but, I'm keeping the second one for a while so that I can put it in my quilt guild's quilt show, May 10-11, 2018.
first Peter Pan quilt finished
both Peter Pan quilt tops (before quilting)

I also made a special quilt for my father in law's 80th Birthday. 
handprint quilt

In October, my large quilt guild had a barn quilt class.  Here is mine.
me with my barn quilt

I've done lots of 'other' sewing this year, too.  Starting with Project Bags.  I finished 13, and have several more, almost finished.


I participated in several Mug Rug exchanges in 2017.  Here are the ones that I made.


We had a name badge challenge in my little quilt guild.  I decided to make a new name badge for BOTH quilt guilds.
for Wego Quiltin'

for Pride of the Prairie

I also made several table runners in 2017.
Kevin's rooster table runner
top from the freebie table, finished by me

Luba's table runner
for the Ugly fabric exchange at the Michigan TOGA
Kimberbell Watermelon table runner
for a gift

finally, something for ME

I also made several aprons in 2017.
Singer #1

Singer #2

Singer #3
I made two of this apron, but, only took a picture of one.  I've been using this one a lot.
like the one's that Nanny made me

I also made 7 purses in 2017 (none for me).  Hopefully I'll have time to make ME one in 2018.
Betty #1

Betty #2
Rene's

Mom's

Doris'

Kay's
added a zipper to this pattern

Michele's

I was in quite a few exchanges in 2017.  I'm not showing any of the blocks, but, here are the pincushions I made for the exchanges.
Lady Bug #1

Lady Bug #2
Spool #1
Spool #2
Sewing Machine

I was also in a Harry Potter exchange.  Here is what I made for that.
Frog Card exchange

I tried making something 'fun' for the chairs that I use in my sewing machine booths.  These wheelies work great!  I now have 3 sets of them.  I have to be honest.  Hubby did most of the work on these, but, I helped.


I brought home a few more vintage sewing machines in 2017, too.  I need to find homes for the Kenmore's (any takers?)
1927 Frister & Rossman hand crank

1950's Singer Sew Handy Model 20 chain stitch

1950's Japanese class 15
1951 Singer 99k (3/4 size machine)
This next machine was given to me at the end of 2016, but, I converted it, and painted the hand crank in 2017.
Post WWII Universal, Japanese class 15
I was given a long arm set-up, from the 1980's, but, I still don't have it set up yet.  It took us a lot of work to get the base cut down so that it would fit down the basement stairs.  We still have to cut down the 3 metal poles before we can set it up.  It's WAY too cold to be working in the garage for a while.  This is the machine that came with the table.
Singer A-1 Quilter
These next 3 are Kenmore's that I saved from the trash.  They all need to be cleaned up and find new homes.
Kenmore 148.292 (1960-61)

Kenmore 158.1355080 (1991?)

Kenmore 158.19460 (1976)
And the last 2 machines of the year.
1950's White electric (Japanese class 15)
1930's Casige chain stitch toy machine (German)

Not too bad, I think, for 2017.  I have lots of projects waiting to be finished early this year.  I haven't sewn a stitch in several weeks, so, I'm ready to get back in my sewing room.